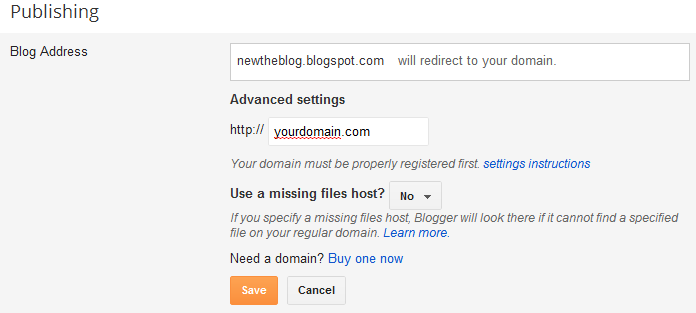
Following are the simple steps to add (web address) custom domain to Blogger blog,
- Open Blogger. Go into the “Basic Settings” of your blog.
- Under “Publishing“, there is your blog address. Click “+ add a custom domain” link.
- Here you can buy a domain name for your blog through a Google partner, or if you already own a domain click “Switch to advanced settings“.
- If you buy a domain name through a Google partner, you are all set! If you already own a domain name, then you have to make some settings in the control panel of your domain registrar’s website.
Settings for Top-Level Domain to Blogger:
What is top-level domain? howthisworks.org is the example of top-level domain.Then what is the other type of domain? There are sub-domains. internet.howthisworks.org is the example of sub-domain.
- To set Top-level domain as the address of your Blogger blog, you have to enter some A-records and CNAME records. Open your domain registrar’s website and log into it to enter these records.
- You have to create four A-records. In place of “Host Name”, always enter “yourdomain.com” and in place of IP addresses, enter following four IP addresses one by one separately in four A-records.
- (216.239.32.21), (216.239.34.21), (216.239.36.21), (216.239.38.21). Only enter numbers in the bracket.
- Create one CNAME record. Where it says “Name” or “Host Name” (It depends on registrar), enter “www”. And where it says “Host Name” or “Value” (It depends on registrar), enter “ghs.google.com”. Save the record.
Settings for Sub-Domain to Blogger:
We should create CNAME record for setting your blog on sub-domain level. Then the address of your blog will be like this, subdomain.yoursite.com. Where it says “Name” or “Host Name”, enter your desired “subdomain”. And where it says “Host Name” or “Value”, enter “ghs.google.com”. Save the record.
Switch to Advanced Settings:
Here in Blogger, you are in the Basic Publishing Settings of your blog. You clicked “+ Add a Custom Domain” link, and then you went into “Advanced Settings”. Below “Advanced Settings”, enter your Custom Domain Name (or Sub-Domain name). Save these changes. Tick mark “Redirect “yourdomain.com” to www.yourdomain.com” and Save. It might take up to 24 hours to get your blog live on your Custom Domain Name. The official help regarding setting up your (web address) Custom Domain to Blogger is available on Blogger support page.

